How To Build A Cloud Environment For Aras
By James Byrne - AESSiS Low Code Architect
Step by Step Comprehensive guide

Why Low Code?
Even if you’ve never heard of the low code approach to PLM application development before, get ready, because you soon will!
This streamlined approach involves rapid design and development with minimal amounts of coding.
There’s not really any single definition of low code development because it’s more of a mindset. But, make no mistake, low code innovators are coming and will increasingly disrupt all kinds of different industries.

Build it with Aras
One of these low-code innovators is Aras. And, coincidentally, their low-code platform is called ‘Aras Innovator’.
If you saw the recent Aras marketing campaign around ‘Build It In Aras’, you will also know that many of the world’s most forward thinking companies are choosing Aras Innovator to quickly build highly differentiated and sophisticated PLM capabilities that deliver competitive advantage.
And in the case of Aras, getting started is pretty easy.
The Aras software can be downloaded & licensed for free (companies may choose to become subscribers later to access additional benefits once they’ve proved the value)
You can set-up an Azure cloud server to host the Aras software for less than $200/month.
You can even use the free Express version of MS SQL to start running a ‘Proof of Concept’ or build a prototype.
Aras KickStart
But to get moving fast, you might also need some expert help.

This is where our Aras KickStart service comes in.
Our Aras KickStart program helps you;
Set-up your first environment (in the cloud or on prem)
Set-up the open version of the Aras software (which doesn’t cost a penny and is how companies like General Motors & Airbus got started… so the story goes!)
Set-up MS SQL (we can even show you how to use the free version of SQL Express)
Show you how to build the standard Aras solutions into your project.
Help you build you first Aras ‘App’ using the Aras low-code platform and modelling engine so you can start to tackle some real-world problems really fast and thereby learn on the job!
Aras Experts on Tap
You get instant access to our team of highly experienced Aras technical experts and the first hour is free.
There is no minimum commitment. Use us as little or as much as you need.
All support is delivered remotely using standard online collaboration tools.
To register or to find out more about the Aras KickStart program contact Sugan at : sugan.rai@aessis.com
Anyway, back to setting up your environment.
https://azure.microsoft.com/en-gb/free/.
The first step is to login to or create your Azure account.
Tip. Right now Microsoft are offering a free 30 day trial
Getting Your Cloud Environment Ready For Your First Aras Project
This document assumes you are building Aras onto a Windows Virtual Machine (VM) in the Azure cloud.
The process is similar for AWS, Google Cloud etc.

Configuring the Virtual Machine
You will need to configure the VM as described & shown below

Completing the Virtual Machine Configuration
You will need to create a resource group and set your region.
Tip. If you plan to access Aras from multiple locations choose a zone that’s suitable.
Next choose a suitable size. This is dependent on how many users will be accessing your Aras Innovator.
Tip. You could start with the default 1 VCPU with 3.5GB and then increase to suit.
As an example, we’re using 4 VCPU with 16GB costing around £225 per month. Performance is really good up to around 50 users.
You will need to add a user name and password under the Administrator account section
Once the Virtual Machine has been created, a standard storage account will be created.
Tip. You can easily add more SSD drives later to create more storage.
You will need to create a Virtual Network & Network interface. This is where you set the IP address of the server.
If you plan to create a domain to access Aras (e.g. mydomain.com) then you will need to create and configure a DNS Zone as shown below.
Then you will need to add the ‘Name Server’ configs to where you are hosting your domains e.g. GoDaddy.com or IONOS.com.

Configuring the VM Server

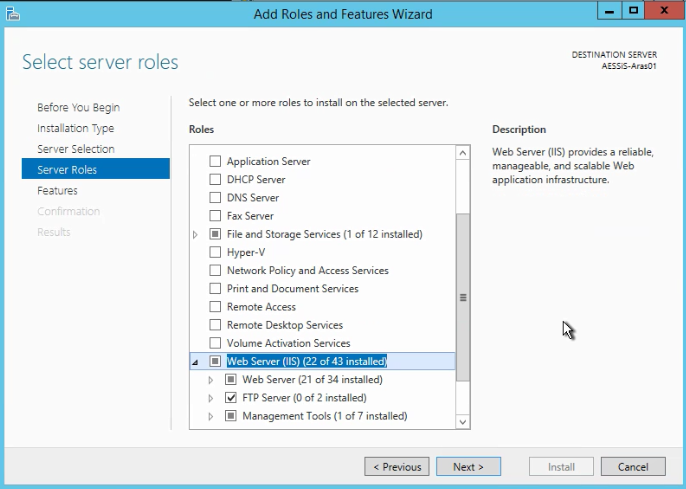
Setting Up Roles & Features 1
Select ‘Role-based or feature-based installation’
Login to the VM as ‘Administrator’ and start ‘Server Manager.
You will need to install the basic roles & features that are necessary for Aras to work.
From Server Manager, select ‘Add Roles and Features’

SETTING UP ROLES & FEATURES 2
Click on ‘Server Roles’
Select Role-based or feature-based installation.
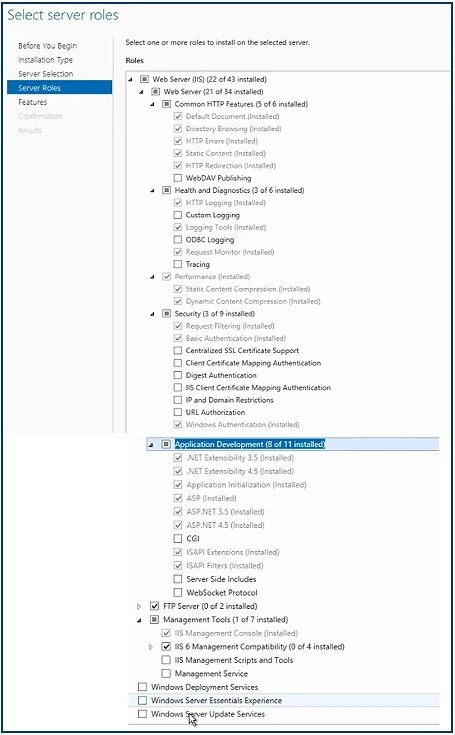
Select Webserver IIS and ensure the items are ticked as below
SETTING UP ROLES & FEATURES 3
SETTING UP ROLES & FEATURES 4

Checking IIS 1

Checking IIS 2

The default IIS website should appear like this on the left.
Checking IIS 3
OK. Your server is now ready for the installation of MS SQL & Aras.

Installing MS SQL
Install SQL in ‘Mixed Mode’ and set an SA password.
If you don’t have MS SQL yet, you can use MS SQL Express.
I also recommend you install MS SQL Studio Manager so that you can better administer your database or databases.
Tip. You must install ASP.Net Core 2.1.8 as a separate step.

Installing Aras
Now go and download Aras.
While you’re waiting for the download to complete, go and download the installation documentation.

Installation Guide
As a minimum, you will need the Installation Guide and the client set-up guide for the browser you intend to use.
Also, go and get an Aras Licence from the Aras website.

You will need your Windows Server MAC Address which you can obtain by opening a command prompt and typing ‘C:\ipconfig /all’

Getting Your MAC Address
Download & read the installation instructions contained in the Aras installation document

Install Aras according to the Installation Guide

Verify that you can login to Aras

Configuring IIS Site Bindings

Configuring OAuth
Then browse to the Aras install folder on the hard drive and open /OAuthServer/OAuth.config folder and add your custom domain.

Install Additional Aras Application
After completing the base Aras installation, you can install additional Aras applications.
To do this you need to download and install the Aras Update Tool
This will give you the ability to install additional Open solutions that are available to non-subscribers.

Use the tool as described in the User Guide.

Complete with the user guide

About The Author
James Byrne is a PLM industry veteran with more than 25 years of experience building high performance environments using advanced ‘Low-Code’ Digital Technologies.
Contact James Byrne at james.byrne@aessis.com